Reduce Your File Size on Blackboard
You may run into various issues when uploading files to Blackboard. This document will provide solutions for these different situations. In all cases, it is important that you keep the original version of all your course materials in your local or cloud files.
- File size is too large to upload to Blackboard
- Need to upload a video/audio file
- Need to reduce overall size of your course
- Still need help? – Contact the Delphi Center
Situation 1: File size is too large to upload to Blackboard
When you are uploading PPT, Word or PDF files, you may run into the issue of the file being too large.
You have a couple options on how to fix that issue that will not impact the visual quality of the images.
- Compress the pictures to reduce the file size
- Link the file from one of the cloud services
Option 1: Compress pictures in your PowerPoint or Word document
- Select a picture in your document. The Picture Format tab appears.
- On the Picture Format tab, in the Adjust group, select Compress Pictures.
- Under Compression options, do any of the following:
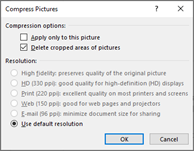
- Make sure that Apply only to this picture is not selected so that the changes you make here will apply to all pictures in the document.
- Select Delete cropped areas of pictures. This option removes the cropped picture data but note that, if you delete the cropped picture data, you won't be able to restore it.
- Under Resolution, select Use default resolution.
- You may also want to delete the image editing data and lower the default resolution. By default, when you edit an image, the data from the original is retained (to ensure the image can be restored). Discarding it means that you can't restore the changes you make, but it will reduce your file size. Lowering the default resolution for images also reduces your overall file size.
- Go to File > Options > Advanced.
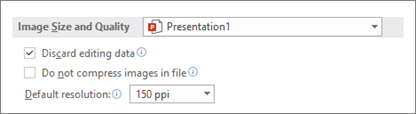
- Under Image Size and Quality, do the following:
- Select Discard editing data. This option removes stored data that's used to restore the image to its original state after it's been edited. Note that, if you discard editing data, you won't be able to restore the image after you edit it.
- Make sure that Do not compress images in file is not selected.
- In the Default resolution list, select a resolution that is 150ppi or lower.
Option 2: Link your files from the cloud
You may store large files in OneDrive then link them to your Blackboard course by adding the link anywhere in Bb via the edit link option. You can use any cloud service but here are directions for the most common at UofL.
OneDrive
Step 1: Copy to your OneDrive Link
- Sign into your Microsoft Account
- Upload/Save files to OneDrive
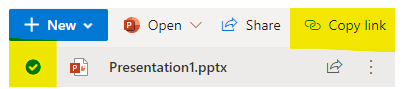
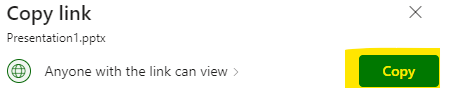
- Select your file, choose Copy Link, then choose Copy. This will allow your students to view your file without having any special type of access.
Step 2: Add link to Blackboard
- Expand the Content Editor (as needed), select the Link icon
- Complete the form provided by pasting the copied link into the "Url" field.

CardBox
Step 1: Request a CardBox account (if you don’t already have one)
- Go to identity.louisville.edu
- Login, click on Request Access up at the top of the page
- Then put a check next to Include Self
- Then go to step two in the drop down box press Search
- Put a check next to Cardbox
- This takes about 24 hours to activate, sometimes a bit longer than 24 hours, but you'll receive an Email that says something like "Welcome to Cardbox...." : ....and there are further instructions here: https://louisville.edu/its/cardbox
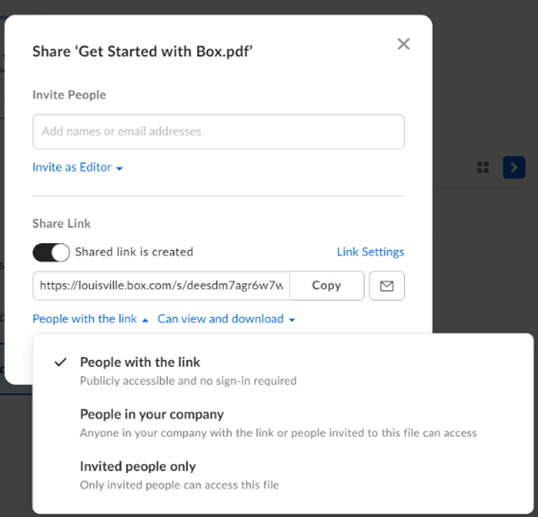
Step 2: Share CardBox files with students
- Upload files to Cardbox
- Select share link toggle for the item you want to share
- Choose the “People with the link” option.
- Choose Copy
- Navigate to Blackboard and to the location where you want to post the file
- Select Build Content > Weblink
- Paste URL you copied
Situation 2: You are using video/audio files in your course
If you have recorded your own video and have mp3 or mp4 files, they will likely be too large to upload directly to Blackboard. The recommendation is to utilize Panopto to host the files. Using Panopto will allow you to use the videos in multiple courses without having to upload multiple times.
Panopto Directions
The following online module contains a wide variety of information about Panopto but you can focus on the Share your audio/video content through Panopto for this task:
Faculty Guide to Panopto: Share your audio/video content through Panopto
Steps outlined in the module:
- Create Panopto Recordings folder in a Blackboard course
- Upload videos to Panopto
- Share content by Embed/link videos in your course OR share with a link.
Situation 3: You need to reduce your overall course size
Blackboard has a course size limit of 500 MB that will prevent you from copying your course to the next semester. This section will give you steps to follow to identify what is causing the issue and take care of it.
Step 1: Check the size of your Blackboard course
- Access your course and navigate to the Control Panel menu. Select Packages and Utilities.
- Then select Course Copy.
- Navigate to the File Attachments section and select Copy links and copies of content (include entire course home folder). Click the Calculate Size button.
- This will show you the size of your course. If you are reaching the 500 MB limit you can follow the remaining steps to fix the issues.
Step 2: Delete files you are not using/are duplicated in Course Content
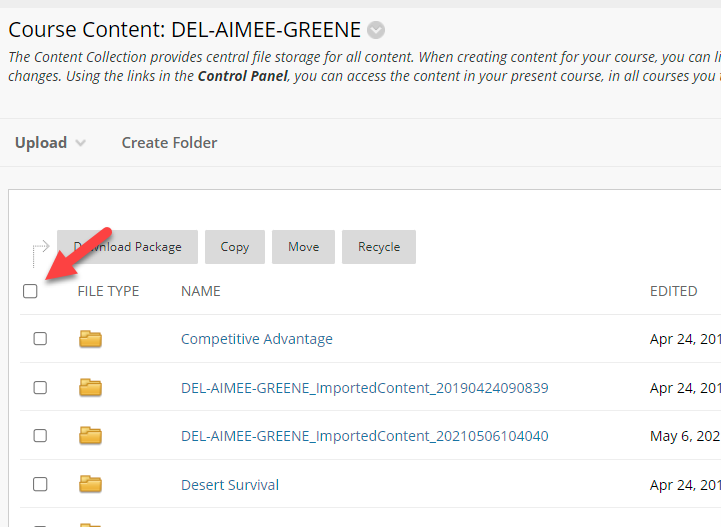
- In your course, click Content Collection under Course Management on the left
- Click the name of the course to access the content for the course. This tool lists all the files that are currently stored in your course.
- Click the top box to select all the files and then uncheck the Recycle Bin
- Click Recycle. This step will analyze all the files and determine which files are not linked in the course.
- You will get a message pop up that says “These items will be moved to the Recycle Bin. Continue?” Click OK.
- The next screen will list all the files that are still linked in the course. Click Cancel. This step avoids deleting the files that you are using.
- Click the Recycling Bin folder, Select all the files and click Delete. This removes the files you don’t need from the course.
- Return to Step 1 and check your course size again to see if the size has decreased.
Step 3: Identify files that need to have size reduced
- Return to you content collection folder and look for large files. You may need to follow the directions earlier in this document to reduce the size of large files that were uploaded before the limitations were put into place.
- Look for mp3 or mp4 files in your content collection that need to be moved to Panopto using the directions earlier in this document.
Help Desk Contact Information
After doing all these steps your file size should be under control. If not, please contact the Delphi Center help desk and we will help you figure out what is going on.
Hours
- Sunday – Thursday, 8 a.m. – 8 p.m.
- Friday – Saturday, 8 a.m. – 5 p.m.
- University Holidays, 8 a.m. – 5 p.m.
Contact Information
- 502.852.8833
- bbsupport@louisville.edu